Friday 24 October 2014

Export MySQL data to CSV file


As much as importing data into MySQL is helpful, you also might like to export your data to CSV file format that is widely supported. You can open your data with spreadsheet like Excel, Libreoffice Calc, Google sheets and more. There are various techniques of how to export a MySQL table to a CSV file, but I'm going to demonstrate two methods.

Method 1: MySQL

Following SQL query will dump all the records from a table called "person" into the file /tmp/export_person.csv as a CSV file.
SELECT * from person INTO OUTFILE '/tmp/export_person.csv' FIELDS TERMINATED BY ',' OPTIONALLY ENCLOSED BY '"' LINES TERMINATED BY '\n' FROM test_table;
Take note of that the directory must be writable by the MySQL database server. Also that it will not overwrite the file if it already exists.

Method 2: Command line

You can also use command line in Linux to get your report. To get the same data as the example above
$ mysql -u dbusername -pdbpassword exampledb -B -e "select * from \'person\';" | sed 's/\t/","/g;s/^/"/;s/$/"/;s/\n//g' > export_person.csv
  • mysql : the executable file (should be where MySQL is installed)
  • -u dbusername : a switch and option for the username to execute the SQL with
  • -p dbpassword : a switch and option for the password of the user
  • exampledb : the database to run the SQL against
  • -B : instructs that the output should be tab delimited (we will convert this to commas later in the command)
  • -e “the sql statement here” : the SQL statement to run returning your data
  • | sed ’s/\t/”,”/g;s/^/”/;s/$/”/;s/\n//g’ : sed is a Unix stream processor, essentially allow for transformations in this case. Here we have four sed commands that change the tabs to double quotes, adds double quotes to the beginning and end of each line and adds a new line marker at the end of each line.
  • > export_person.csv : outputs the results to the file named export_person.csv
I hope that this is somewhat helpful.

See also Import csv to MySQL
Monday 13 October 2014

I'm not much of a windows fan.

This is how I pemanently "fix" my Windows computer's

Sunday 7 September 2014

Google Play Store settings you might like to turn off


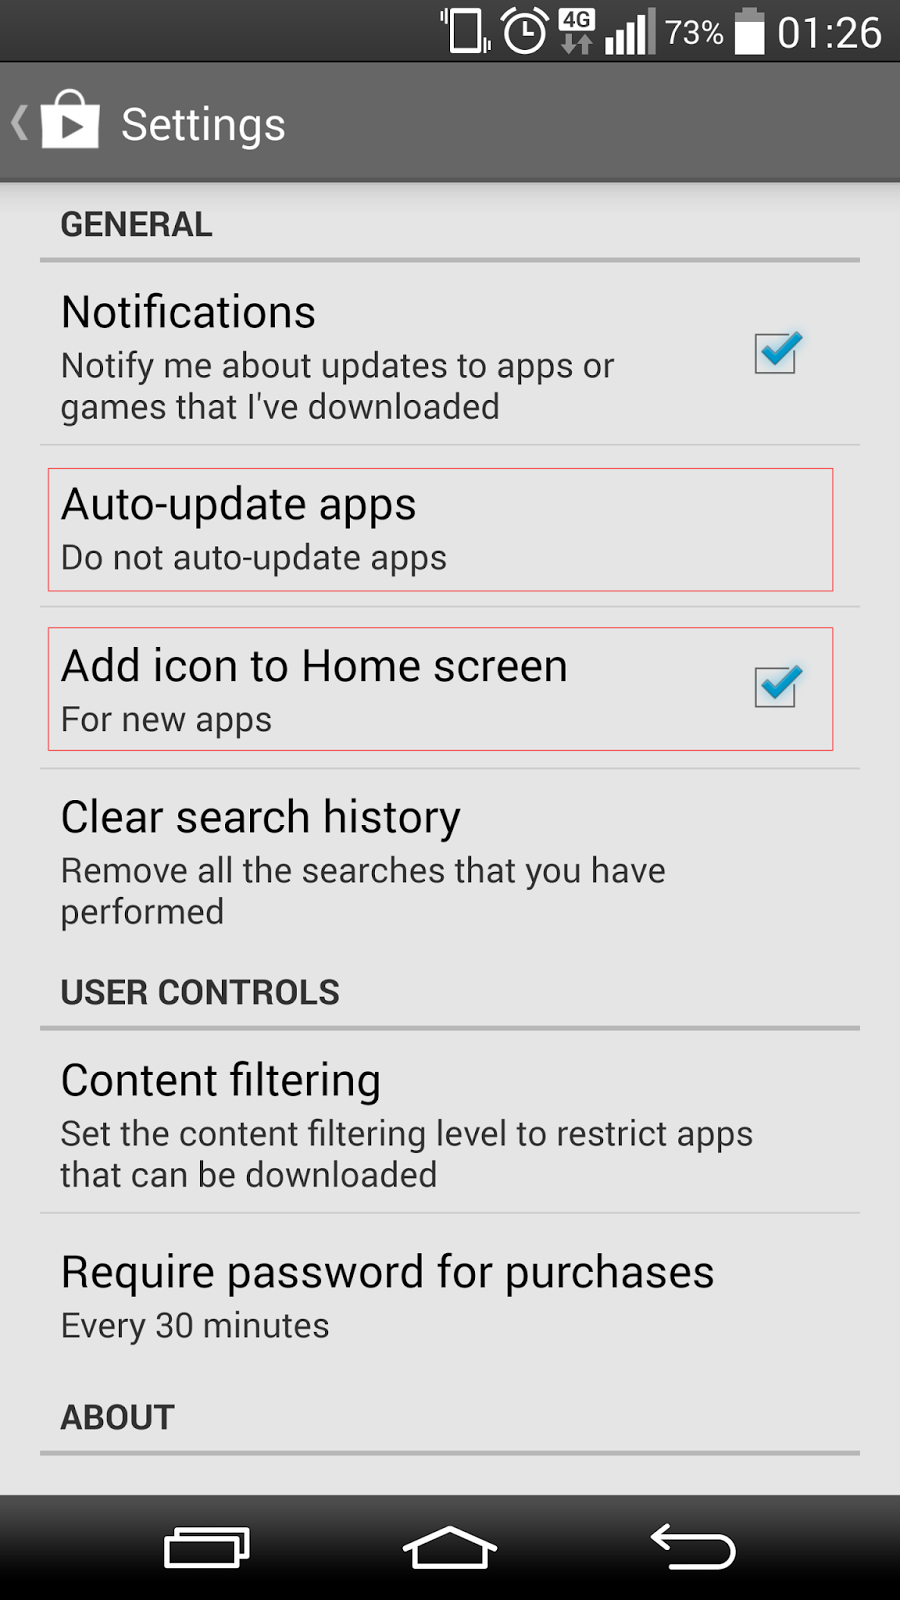
There are two settings in Google Play Store I like to turn off on my phone, the “shortcut on homscreen” and Auto-update apps. I really do not like to add a shortcut to my homescreen for each and every application that I ever download.
  • Open up the Google Play Store app on your phone or tablet
  • Slide out the menu from the left of the screen
  • Open "Settings"
  • Under "General" you'll find an option to "add icon to home screen"
  • Make sure the checkbox is unticked
From now on out you'll not be filling up your home screen with dozens and dozens of apps as you install them.
Next step is to control how you update your apps. Open up the Google Play Store app on your phone or tablet
  • Slide out the menu from the left of the screen
  • Open "Settings"
  • Under “Auto-update apps” you'll find options to control when you update.
  • I prefer “Do not auto-update apps”


Monday 21 April 2014

css for Keyboard input tag kbd


Describing a keyboard shortcut can be done by using the tag <kbd>, it is a phrase tag and defines keyboard input in the browser's default monotype font.
By using css you can make the code look like a key button's
 kbd {
padding: .1em .6em;
border: 1px solid #ccc;
font-size: 10px!important;
font-family: Arial,Helvetica,sans-serif;
background-color: #f7f7f7;
color: #333;
-moz-box-shadow: 0 1px 0 rgba(0,0,0,0.2),0 0 0 2px #fff inset;
-webkit-box-shadow: 0 1px 0 rgba(0,0,0,0.2),0 0 0 2px #fff inset;box-shadow: 0 1px 0 rgba(0,0,0,0.2),0 0 0 2px #fff inset;border-radius: 3px;
display: inline-block;
margin: 0 .1em;
text-shadow: 0 1px 0 #fff;
line-height: 1.4;
white-space: nowrap;
}
Example:
<kbd>ctrl</kbd>+<kbd>p</kbd>

ctrl+p

That looks better.
Monday 3 March 2014

How to install rpm packages on ubuntu or mint

Installing rpm packages on ubuntu, mint, or debian

The suggested method to install software or deb packages on Ubuntu/Mint linux is via Synaptic, Ubuntu Software Center/ppa, or an apt-get command from the terminal.
You might sometimes need to install rpm package to your ubuntu/mint linux/debian box, there is a utility called Alien, Alien converts an RPM package file into a Debian package file or Alien can install an RPM file directly.

Install Alien
Open your terminal CTRL+T and enter this line.
sudo apt-get install alien

Installing RPM package directly
sudo alien -i package_name.rpm

Converting the RPM file to a Debian package
sudo alien package_name.rpm

Installing the converted Debian package
sudo dpkg -i package_name.deb

For additional Help, use
alien -h

Friday 21 February 2014

Dropbox Fails To Start


Past few days Dropbox have not started on my Linux computer, I'm running Ubuntu 13.10. When I try to start Dropbox manually by command line, I get this error:
$ dropbox start

Starting Dropbox...Traceback (most recent call last):
  File "dropbox/client/main.py", line 13, in 
  File "autogen_explicit_imports.py", line 13, in 
  File "ui/common/selective_sync.py", line 6, in 
  File "arch/__init__.py", line 28, in 
  File "arch/linux/tracing.py", line 8, in 
  File "hard_trace.py", line 6, in 
  File "client_api/connection_hub.py", line 21, in 
  File "client_api/kv_connection.py", line 23, in 
  File "pylinux/__init__.py", line 71, in 
  File "cffi/api.py", line 311, in verify
  File "dropbox/overrides.py", line 398, in load_library
  File "cffi/verifier.py", line 69, in load_library
  File "cffi/verifier.py", line 154, in _load_library
  File "cffi/vengine_cpy.py", line 124, in load_library
VerificationError: importing '/home/olig/pylinux/__pycache__/_cffi__xa0c4f46bx1d95b4de.so': No module named _cffi__xa0c4f46bx1d95b4de
To fix this, open a terminal CTRL+T and run the following commands
sudo rm -rf /var/lib/dropbox/.dropbox-dist
dropbox start -i

Extra

For more Dropbox command line options
$ dropbox help

Dropbox command-line interface

commands:

Note: use dropbox help command to view usage for a specific command.

 status       get current status of the dropboxd
 help         provide help
 puburl       get public url of a file in your dropbox
 stop         stop dropboxd
 running      return whether dropbox is running
 update       download latest version of dropbox
 start        start dropboxd
 filestatus   get current sync status of one or more files
 ls           list directory contents with current sync status
 autostart    automatically start dropbox at login
 exclude      ignores/excludes a directory from syncing
 lansync      enables or disables LAN sync


Installing LAMP (Linux, Apache, MySQL and PHP) On Linux

I'm running XLinux on my laptop and need to install webserver with php and MySQL, LAMP. (Linux, Apache, MySQL, PHP). Really thats a simple task, and I'm going do demostrate how

Step one, Install Apache

Open your terminal CTRL+ALT+T and enter following line.
sudo apt-get install apache2
Test Apache using this address in browser http://localhost/ and you will see a message saying:
It works!
This is the default web page for this server.
The web server software is running but no content has been added, yet.

Step two, install PHP

sudo apt-get install php5 libapache2-mod-php5
Restart Apache
sudo /etc/init.d/apache2 restart
Now we can test php by adding to the terminal
sudo gedit /var/www/test.php
This will open up a file called test.php
Add following line
<?php
phpinfo();
?>
Open http://localhost/test.php in browser, you should see info about your php

Step three, install MySQL

Open the Terminal and then copy/paste or type this line
sudo apt-get install mysql-server
And it's done. You can now access your MySQL server like this
mysql -u root -p
--cheers
Friday 7 February 2014

How to create animated gif from video or images

There are many websites that generate animated gif from video for you, but most of them leave a watermark or logo on the gif. You can easily create your own and in this example we are going to use OpenShot 1.4.3 and command line tool, convert
First step is to select a video and edit it in OpenShot, select the part you like to animate and cut out everything else. If you already have sequince of images to use go strait to second step.
I selected very simple video only containing spinning dots.


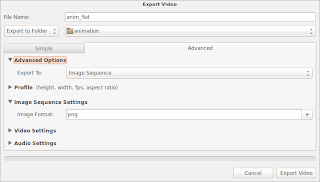
To add files you can use CTRL+F and browse for file from there, or click on the "plus" sign. Next you drag the imported file down to the track part of OpenShot where you ca examine and cut the video. I selected ~2 sec to use of my video. Next you need to export the video, CTRL+E or the red circle. Now you can select where too and how. First select destination, I prefer to use new/empty directory.

Remember to set filename with leading zero; filename_%02d

Export 2
Export to "image sequence. Image format.
Now you might have some number of images.
Second step.
You should browse the images to see if the fit the loop you are aiming for. In my example I deleted first few and last few, leaving about 29 images.
The gif can get quite big, in that case see if you need to scale the images. My images are 720x480 px, and I like to scale the down to 45% of that size.


for file in *.png; do convert $file -resize 45% c-$file; done
Third step. After scaling the images it's time to create animated gif.
convert -delay 4 -loop 0 *.png my_animation.gif

Here is the final image.

Tuesday 4 February 2014

How to break out of iframe

There is a simple method I use to prevent pages on my website from being included through an iframe by another website. First I create one file no-iframe.js including
if (top.location!= self.location) {
 top.location = self.location.href
 }

Now you can add this to the header of any page of your website.
<script src="js/no-iframe.js" type="text/javascript"></script>

Now your site wont be "framed"
Wednesday 15 January 2014

SSH with DSA public key authentication - password less login

After taking pictures on your raspberry pi you might want to transfer the images to your PC. You can use several methods but I'm going to use scp over ssh using password less login. That way I can automate the transfer.
In this example I used following devices

Raspberry pi, IP 192.168.1.10 and user pi
Linux laptop, IP 192.168.1.20 and user foo

Step 1: Create Authentication SSH-Kegen Keys on the raspberry pi

Login to your rpi 192.168.1.10 with user pi to generate a pair of public keys
[pi@raspbmc ~]$ ssh-keygen -t dsa
If you do not want to give your file a name, just press enter. Or you can
Generating public/private dsa key pair.
Enter file in which to save the key (/home/pi/.ssh/id_dsa):
Enter passphrase (empty for no passphrase):
Enter same passphrase again:
Your identification has been saved in .ssh/id_dsa.
Your public key has been saved in .ssh/id_dsa.pub.
The key fingerprint is:
83:8d:95:48:d3:25:11:48:f5:de:53:47:98:54:a2:b6 pi@pi
The key's randomart image is:
+--[ DSA 1024]----+
|         .++==++o|
|         ..+.+o..|
|          +   o.o|
|       o o   . +o|
|      . B   . .Eo|
|         .   .  .|
|            . +  |
|    a   o.       |
|          .      |
+-----------------+

Step 2: Upload Generated Public Keys to – 192.168.1.20

Use SSH from server 192.168.1.1 and upload new generated public key (id_rsa.pub) on server 192.168.1.20 under pi‘s .ssh directory as a file name authorized_keys.
[pi@raspbmc ~]$ cat .ssh/id_rsa.pub | ssh foo@192.168.1.20 'cat >> .ssh/authorized_keys'
foo@192.168.1.20's password:

Step 3: Set Permissions on – 192.168.1.20

Due to different SSH versions on servers, you might need to set permissions on the .ssh directory and the authorized_keys file.
[pi@raspbmc ~]$ ssh foo@192.168.1.20 "chmod 700 .ssh; chmod 640 .ssh/authorized_keys"
foo@192.168.1.20's password: [Enter Your Password Here]

From now onwards you can log into 192.168.1.20 as foo user from server 192.168.1.10 as pi user without password.
[pi@raspbmc ~]$ ssh foo@192.168.1.20

And now you can use scp to transfer files manually or you can automate transfer with script
scp file foo@192.168.1.20:/tmp

Monday 13 January 2014

cURL timeout problem and solution

One page I made uses cURL to scrape small data from external web page. The problem I faced was when the page was offline for a while, my page did not load.

The fix I stumbled into was to add these three lines to my code.
 curl_setopt($ch, CURLOPT_TIMEOUT_MS, 5000);
 $curl_errno = curl_errno($ch);
 $curl_error = curl_error($ch);
 
Now my page still runs when the remote page is down and I get a error message.
 $url = $_GET['url'];
 $ch = curl_init();
 curl_setopt($ch, CURLOPT_URL, $url);
 curl_setopt($ch, CURLOPT_NOSIGNAL, 1);
 curl_setopt($ch, CURLOPT_RETURNTRANSFER, true);
 /* set timeout in ms */
 curl_setopt($ch, CURLOPT_TIMEOUT_MS, 5000);
 $data = curl_exec($ch);
 $curl_errno = curl_errno($ch);
 $curl_error = curl_error($ch);
 curl_close($ch);

 if ($curl_errno > 0) {
  echo "cURL Error ($curl_errno): $curl_error\n";
  } else {
  echo $match[0][0]);
  }
Wednesday 8 January 2014

Timelapse with Rapberry Pi camera module

As I have mentioned before I always wanted the camera module for the Raspberry Pi. Until now I had only tried out timelapse using my laptop web camera, and that gave me really crappy images. Now I have the camera module to play with and the images are way better. This is timelapse from 12:00 31. Des 2013 to 12:00 1. Jan 2014 shows 24 Hours in 5 minutes and 26 sec. including some fireworks.


This script will take image every 5 seconds 1440 times leaving you with just enough to create 60 sec timelaps video using 24 fsp

#!/bin/bash
# Timelapse controller for USB webcam
DIR=/home/user/timelapse
x=1
while [ $x -le 1440 ]; do                                                       
filename=$(date -u +"%Y%m%d-%H%M-%S").jpg                                       
raspistill -o $DIR/$filename -w 1280 -h 960 -n -t 1000
x=$(( $x + 1 ))
sleep 5;
done

Now you have 1440 images or the number you entered and next step is to create the video. Copy the images to your computer using scp or rsync, you can add that to your script if the Raspberry pi is connected to network. When you have all your images on your computer you can render video with mencoder. Install mencoder if needed.

sudo apt-get install mencoder

#!/bin/bash
DIR=/home/user/timelapse/
ls $DIR/*.jpg > list.txt
mencoder -nosound -ovc lavc -lavcopts vcodec=mpeg4:aspect=16/9:vbitrate=8000000 -vf scale=640:480 -o $DIR/$(date -u +"%Y%d%m-%H%M-%S").avi -mf type=jpeg:fps=24 mf://@list.txt
rm list.txt

All ideas about improving this code are welcome.
-cheers